Saturday, October 17, 2015

Movement

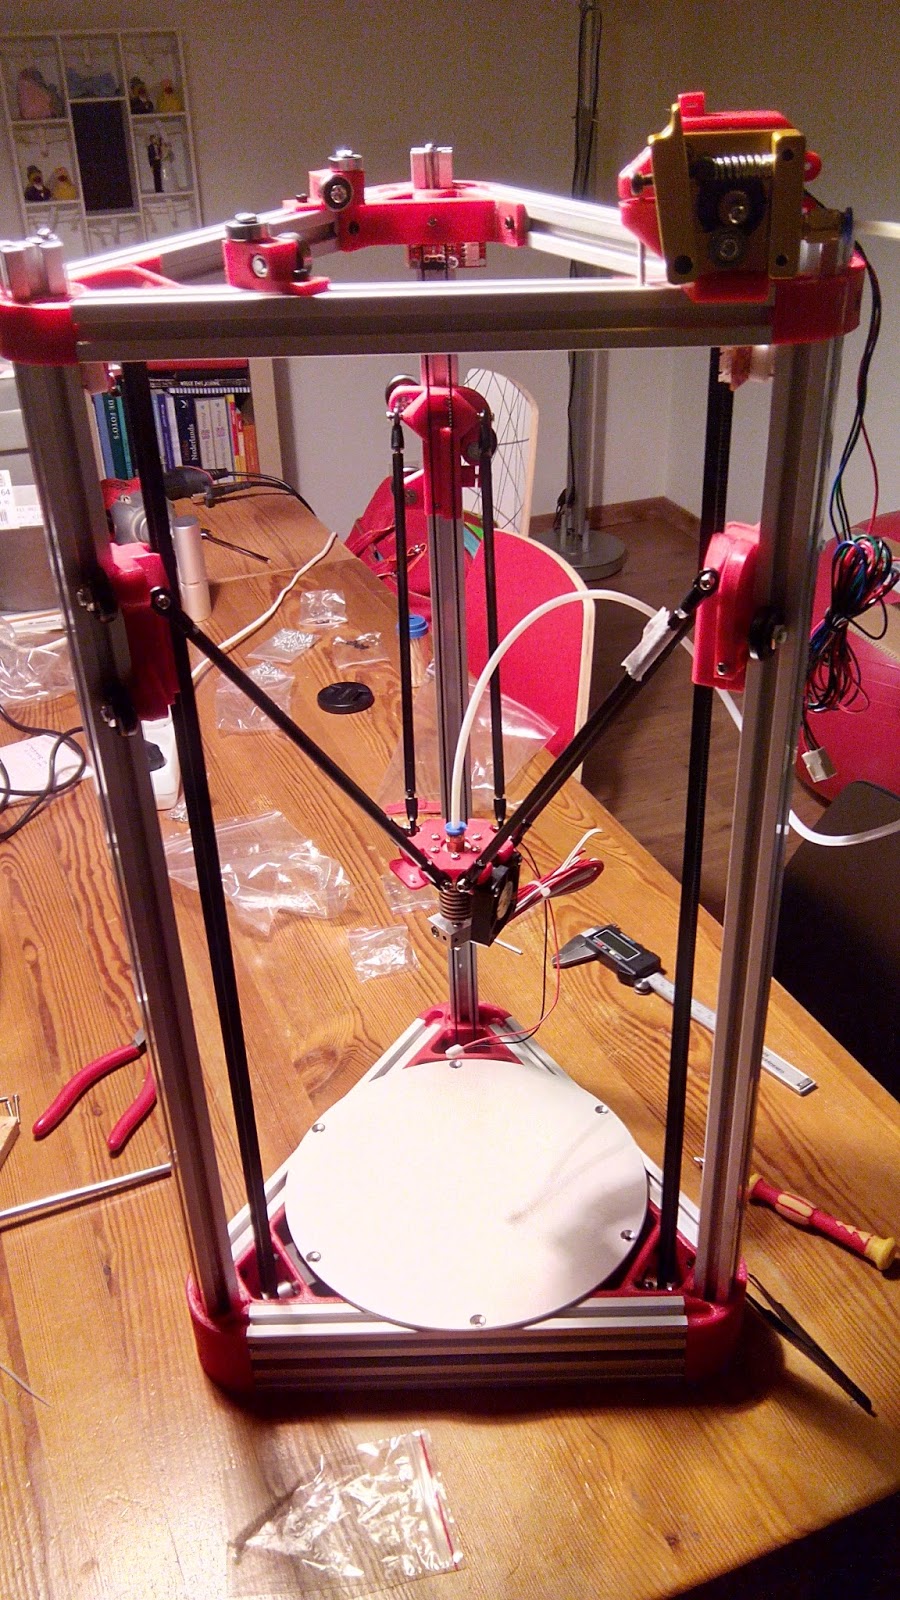
SO i found some time to work on the printer again. I'm having serious trouble with the z-probe. The parts that came in the kit were just not really useful. I had to melt the hole of the z-probe holder so it would allow smooth(er) movement of the probe> Unfortunately the block that holds the spring into place is fouling against the heatsink of the hotend. This way the probe was not deploying well, and not triggering. Eventually i replaced the block with the inside of a terminal block. Not fouling anymore, and the probe is deploying fine now. Triggering the endstop still seems pretty random. Maybe i should find a way to lube it to allow it to trigger better. This will be worries for later, as i first want to get it working without using the probe. 

 On to the electronics! on the picture below you can see the arduino mega with the RAMPS 1.4 shield. stepper drivers are already installed. just no heatsinks yet.
 I started by wiring up the steppers and the extruder. I also managed to solder a solid joint on the heatbed, although that was very hard. The soldering iron needed to be turned up full and even then the heatbed just saps away all the heat that you throw at it, making it very hard to get a nice joint.
Sad to say that while the joint should hold, it's not a result to be proud of.
 Next step: connecting the hotend, the endstops, the fan, and the main power supply. Its starting to look like a rats nest in there.
 well.... for the moment not only IN there... the outside is a rats nest too.
 The PSU. I've cut the wiring from an old lamp with a foot switch build into it. This way i can shut my printer down fast and easy if things get hairy. I have not yet installed and connected the heatbed. because of this, I've also not yet connected the second 12v output to the RAMPS unit. First i want movement.

Now, its software time...
I downloaded the arduino IDE, Set the com port, set the device... load the marlin firmware provided, adjusted the rod length to 21.9mm, and compiled it.
ERROR 'ACCURATE_BED_LEVELING_POINTS' was not declared in this scope
the hell?
After searching for a bit on google i stumbled upon this thread. Applying the first suggestion seemed to work for me. The firmware compiled without any errors after that, although it makes me wonder if i should look for more up to date firmware. The one Sintron provided is clearly not very recent if that bug has been in marlin 1,5 year ago. Can't imagine that hasn't been patched yet.

Next, loading pronterface, connecting with the printer, and trying a simple move!
Another error... Printer reset, max temp triggered.
At first i thought this was because i hadn't installed the heatbed thermistor yet... so i did that, but the error didn't go away. After a quick search i found the source of my problem in the firmware.
After i adjusted the temp sensor values to "1" for a 100k thermistor, i could click on the move buttons:

Enough work for today. I'm really excited!
Next week i should be able to do some calibrating.

Sunday, October 4, 2015

nearing the end of the building phase

A short update although i'm very pleased with the amount of progress that i made. There was just one problem: I just found out that i was taking pictures without a memory card in my camera, so i dont have a lot to show. 
First of all; i installed the extruder. After taking this picture i actually found out that it would be better if it was more towards the corner, so i adjusted that later. 
 Second: I glued all the rods, and installed them. I have a working effector now!
The big dilemma was; shiny side up, or down? I finally chose down because that side needed to fit with the clip that holds the hot end in place. I also found out after i installed the hotend, that my effector is not level. on one side there are 3 layers under the hole for the nut. on the other side, there is only 1 layer. Most likely the printer that printed this part had a very badly calibrated printbed.
As a result my hotend is sloped at a 2 degrees angle, so i'll add that to the list of parts that i will need to reprint and replace ASAP.

photo taken by phone.
When i wanted to install the z-probe, i found out that my soldering iron is dead, so i couldn't continue. As soon as i have a (temporary) replacement, i will continue with the electronics.

Saturday, October 3, 2015

A bit more progress. Almost there!

I did not have a lot of building time this week, so i decided to stick to the small tasks I created a jig by printing this jig parts with my micro, and screwing them onto a piece of wood. it fits perfectly, which i actually didn't expect from something printed by the micro.
I bought some 2 component epoxy, and glued the rod ends in the carbon tubes. I thought that i could win some time by gluing 1 rod end into one of each rod, and do the adjustment later with the other end to get it to the same length in the jig. Big mistake. because i had to let it dry like you see in the picture, It wasn't totally straight, and now i have slightly off-center rod ends which will probably result in a couple of a tenth of a millimeter difference for each rod. Also, these rods are 9mm shorter than the rods provided by sintron because i ordered the wrong length. I'll see later how much impact that will have on the total printing area. probably not too much.
The endstop holders provided by sintron were a joke. Thin, and the holes didnt match the wholes on the endstops at all, so i printed these on my micro. See the picture below.
And they do fit well. Because of the design it will be a bit harder later to adjust the height of the endstops. to do that i'll need to remove the physical endstop first. Lets hope that won't be necessary a lot.

I was able to cut the belts to length, and get the right tension on the belts.
 The spool holder got installed:
 And a spool fits and turns nicely on it.
 Next tasks: finish gluing all the rods, and getting that effector in place. I should also be able to install the extruder now.

Thursday, October 1, 2015

First 2 real building days

Because of a lightning strike that fried my internet modem, i had to postpone this update a couple of days. I had 2 free days to (re)build my printer, and i took advantage of it. 
The next step in the project was inserting the vertical extrusions. Initially it seemed to went pretty well, but then the shit hit the fan. 

 Some of the T-nuts on 2 of the 3 corners grabbed on the extrusion thile inserting it, and were dragged down. some serious damage was done to the extrusions (see picture below), and a bit to the corners.
I had to take EVERYTHING BACK APART, put the corner pieces in boiling water again, and hammer the vertical extrusions out of them. By putting it all back together i have found the best way to use the t-nuts is to align them parallel to the extrusion while inserting it, and keeping it screwed tight. After the extrusion is in place, you can loosen the screw a couple of turns and tighten it again, and the t-nut will turn 90 degrees and grab the extrusion without the risk of damaging it all.

With all that finally in place it was time to start installing the moving parts. The steppers:


And the carriages:


At this point, i had put over 10 building hours in this kossel, including the time taking it all apart and putting it back together again. not bad for a first time building in my opinion.
According to the manual the next step was putting the pushing rods together. This proved to be a problem as i discovered that the carbon rods were not threaded (seems to be common knowledge or something), and i have to epoxy the rod ends in.
I don't have epoxy, and i have no experience in using it, so i postponed this step.


The last step that i attempted this weekend was installing the top. That didn't went without a little problem:

Yup, i broke 2 out of 3 top corners.
I attempted to repair them with instant glue. put them on again, and they broke again. In the end i decided to just place them and i added glue as reinforcement after correctly positioning them. I'll try to get the printer running, and as a first project, print some replacement top corners.

I got a little confused by sintrons' belt tensioning system. The manual talks about it, but there are no parts to create it. I went for it and used some old washers that i had lying around to create my own belt tensioning system, but i don't think this kit intends to let you use one...

altogether i'm satisfied with the progress. it starts to look like a delta now, just without the effector. that will take more time to build than i anticipated.

Thursday, September 24, 2015

First steps, and frustrations

So, i finally had some spare time on my hands, and i decided to give it a go!
Step 1 according to the reprap forums was to take a rubber mallet, and drive a short 2020 extrusion into the corner pieces to "shave" off some of the rough inside. So that's what i started off with.

They should have warned that its a really tight fit! 20 minutes later i found myself with 3 bottom corner pieces, and 3 short extrusions totally stuck in there. They just wouldn't budge. After searching around, i found a very helpful tip the next day that told me to soak the stuck corner in hot water, and then hit it with a mallet. luckily, that worked a charm. I was already browsing ebay to buy replacement corner pieces...

Next step: drilling the top corner pieces so that the M3 screws that will hold the top bearings can fit in the badly printed holes:
Immediately i ran into frustration nr2: apparently my drill died. The battery which is supposed to provide 11v only provides 6.5v now, so probably one of the 3 battery cells died after 1 year of collecting dust in a closet.
It's still under warranty, but i know i can fix the battery pack myself with a spare 18650 battery, but not without voiding the warranty... I don't want to void my warranty, but i want to continue building the printer now... the struggle is real!


So i started off with things that i can do. I started building the bottom and part of the top frame.
The first corner was a bit of a struggle. after that it was smooth sailing. You care basically repeating the same steps 6 times.
And then i ran into problem #3: bad quality nuts. they provide these special nuts to lock 2020 extrusions, but they are of bad quality. the screws didn't grab a couple of them properly, and the worst part is that you only find out about that when you push everything together, and to replace it, you must take it all apart again.

After inventing a couple of now swearing words, i have to say that i cant be disappointed for today.
Below are pictures of the progress.


I made more pictures of the building itself, but i found out tonight that the SDcard was still in my laptop apparently. So no pictures saved, and only pictures of the final result.

Hopefully i can make some more progress in 2 days.

Wednesday, September 16, 2015

Unboxing and first impression

So my kossel kit arrived. Seems like everything is there.
My first impression: the quality of the printed parts is so-so. Their own printer certainly has some problems with overhangs. Even my micro should be able to create higher quality prints than that (but unfortunately not the right size, so reprinting it with my micro is a no-go. I will probably need some brute force, a dremel, and a good drill for everything to fit.
I really like the extruder that came with the kit. easy to use and adjust the tension. I think this is one of the higher quality parts in this kit.
Lots of screws, nuts and bolts.... not going to count that all! lets assume it's all there.
The printbed is of way different quality than i assumed (for the better). I expected a thin heatbed, and a separate aluminium slate to fit on top of it, but apparently it's one solid heatbed. Looking nice flat, and sturdy. Pleasant surprise there.

and last: good looking rods, and big heavy rod ends.... wait... what?! didn't i get a refund because i didn't want to use their rods and ends, and ordered carbon fiber rods and traxxas ends because of that? It seems like they still shipped me the whole package.

Some pictures below.


Monday, September 14, 2015

On it's way

So.... the Kossel kit is on it's way. should be here by September 15 or 16. The kit set me back around 310 euros. I asked Sintron to ship it without the rods and rod-ends. They refunded me a part of the kit, and i bought Traxxas rod ends, and carbon fiber rods to replace those. I hope i made a good choice there.